Paper Pumpkin Alternative: No Matter the Weather

2020-03-27T16:58:37-05:00March 27th, 2020|

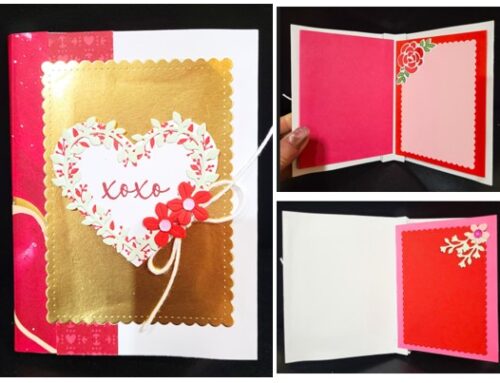
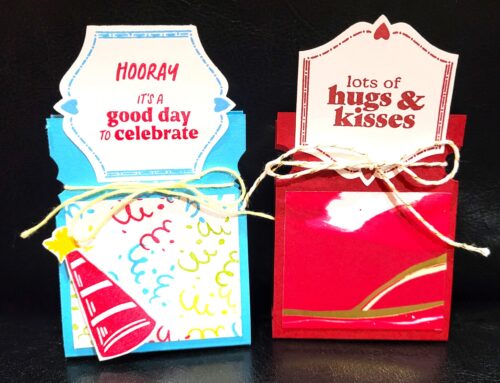
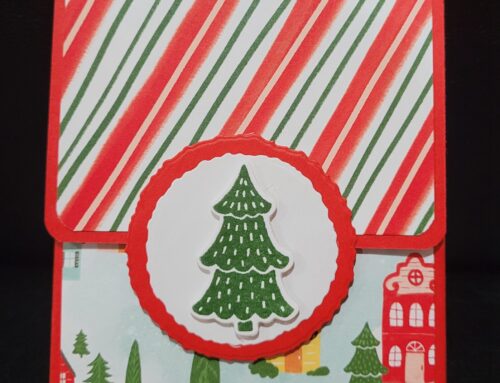
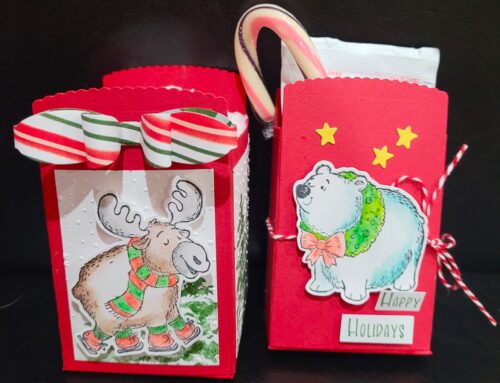
Other than the three cards that were created by the Paper Pumpkin design team,  I want to show you two more projects that I created with the supplies from March Paper Pumpkin box.  I really like the pre-colored and cut out embellishments that came with the box.  It helps you to create the super cute project easy without stamping and coloring.

The first project is a quick and easy treat holder.  You can make it in 5 minutes.  Really!!  Only 5 minutes!!!  The only extra supplies that I used were the Seaside Spray Card stock and Petal Pink 1/4″ Metallic-Edge Ribbon.

Here are supplies that you need for the project:

  • Seaside Spray card stock: 2 x 8 1/2
  • Petal Pink 1/4″ Metallic-Edge Ribbon.
  • Delightful Tag Topper Punch
  • Real Red Ink Pad
  • Black Ink Pad
  • Hershey’s Nugget Chocolate Candy
  • Double side tape
  • Glue
  • Stampin Dimensionals (pop dots)

Here is how:

  • Score the 2 x 8 1/2 card stock at 3 3/4 and 4 3/4 on the long side of the paper.  The easy way to do it is to score 3 3/4 from both sides.
  • Use the Delightful Tag Topper Punch to punch out the tag top from both ends of the card stock.  Your card stock will have scallop details and a hole on both ends.
  • Use the embellishments from the kit to decorate the front candy treat.  I used the rain boots with the daffodil flowers, white stitched circle, and the long pink sentiment label.
    • Glue the rain boots with the daffodil flowers image to the card stock
    • Stamp the sentiment on the white stitched circle
    • Glue the white stitched circle to the center of the long pink sentiment label
    • Stamp the little red hearts on the long pink sentiment label.
    • Use the Stampin Dimensionals to attach the sentiment to the treat holder
    • Add some glitter to the flowers with Wink of Stella Glitter Brush.
  • Use double sided tape to attach the chocolate to the center of the paper.
  • Hold the holes from both ends together and insert the Petal Pink Ribbon through the holes.
  • Use the twine from the Paper Pumpkin box to tie a bow to secure the ribbon.

Here is the side view of the treat holder
*************************************************************************************************************************************

The second project that I want to show you is my favorite shaker card?  It’s not difficult to make the shaker card but it makes the card looks 10 times special.

Here are supplies that you need for the project:

  • Seaside Spray card stock: 5 1/2 x 8 1/2
  • Whisper White card stock: 4 x 3 3/4
  • Layering Squares Dies
  • Window sheet: 3 1/2 x 3 1/2
  • Foam Adhesive Strips
  • Real Red Ink Pad
  • Black Ink Pad
  • Woven Threads Sequin Assortment
  • Glue
  • Stampin Dimensionals (pop dots)

Here is how:

  • Fold the Seaside Spray Card Stock in half on the long way as the card base.
  • Glue the Whisper White card stock on the Seaside Spray card base.  I glued it toward the right-hand side of the card base.
  • Cut one of the card base from the Paper Pumpkin box into 3 3/4 x 3.  I chose the one that the background has the grass and sky.
  • Use the Layering Squares Die to cut out a “window” from the card base from Paper Pumpkin Box.
  • Put the background paper (both window frame piece and the square that been cut out) in the center of the Whisper White card stock.
  • Glue the cut out square on Whisper White card stock.
  • Glue the window sheet on the window frame that you just cut out.  Make sure that the glue side is not the side that has the background images.
  • Use the Foam Adhesive Strips to build walls around the window frame.  These walls are for the sequins to stay on the card so make sure there is no space in between.  Otherwise, the sequins will fall out when you shake the card.
  • Put the sequins in the center of the square that you just glued down.
  • Remove the back of the Foam adhesive Strips and attach it to the card base.  The sequins should be inside the window that you just created.
  • Use the embellishments from the Paper Pumpkin Box to decorate the rest of the card:
    • Glue the rain boots with the daffodil flowers image to the card stock
    • Stamp the sentiment on the white stitched circle
    • Glue the white stitched circle to the center of the long pink sentiment label
    • Stamp the two little red hearts on the long pink sentiment label.
    • Use the Stampin Dimensionals to attach the sentiment to the treat holder
    • Add some glitter to the flowers with Wink of Stella Glitter Brush.
  • Use the twine from the Paper Pumpkin box to tie a bow and attach it to the card.

You can click here to see how the shaker card is made.  

There are only a few days left for the Sale-a-Bration time.  There is a 3rd release for the Free Sale-a-Bration items that you can get for FREE.

I like to buy the prepaid Paper Pumpkin during the Sale-a-bration time.  That means you can get more free stuff when you prepay for your monthly box.

Learn more details about Paper Pumpkin

Ready to create?  Here’s what you need:

Paper Pumpkin Grid Paper
#153985

$12.50

3 months PP
#137859

$63.00

6 months PP
#137860

$114.00

Real Red Ink
#147084

$7.50

Seaside Spray CS
#150883

$8.75

Window Sheet

#142314

$5.00

Foam Adhesive Strips

#141825

$8.00

Petal Pink Ribbon

#151194

$7.00

Woven Threads Sequin

#149498

$5.00

Thanks for Looking!

Share Crafts Purfect With the World!

Go to Top